
User's Guide
Getting Mobile Prep onto your phone is easy: register for free, log in after you've been sent the password and click on Get Mobile Prep from the welcome page. That's it! We'll send Mobile Prep to your phone so that all you'll have to do is wait for a message to come to your phone and, when it comes, accept it.
Buttons you'll use may look different on different phones but are all arranged in generally the same way, as shown below:
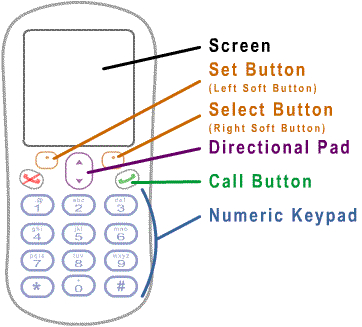
All phones will have two buttons below the screen called soft buttons. They are "soft" because they are not hardwired to any particular function and may do different things at different times. For Mobile Prep, we will call the soft button on the same side as the Call Button the Select Button and the soft button on the other side of the Directional Pad, the Set Button. Labels on the Screen will describe what they actually do at any given time and we'll include that when we refer to the buttons (e.g. when the Select Button's Screen label is Show, we'll refer to it as the Select Button [Show]). In this guide, we'll assume the Call Button is on the right, as they are for Motorola phones. If your Call Button is on the left, such as they are for Nokias, then the Select Button will be on the left and the Set Button will be on the right: Simply reverse what we illustrate in the figures here.
The Directional Pad allows you to scroll up and down if there is more than a screenful to display. The Numeric Keypad is used for selecting answers to multiple choice questions.
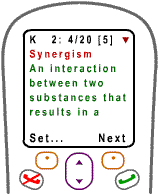
Below is an example of a Screen which shows that you can
Starting Mobile Prep generally means going to your phone's main menu and selecting the "games / application" item, which will show you a submenu with Mobile Prep. The particular details on how this is done will vary depending on the phone you have and the carrier you use. The manual that came with your phone will tell you exactly what to do. (Describing the process for every possible phone here will not only make this guide intimidatingly long, it will also make it obsolete very quickly since manufacturers and carriers tend to change the interfaces somewhat frequently.) If you are unable to find your manual and your phone's web site has no information, then feel free to contact us with and we'll be happy to help you.
Once you've located Mobile Prep on your phone, select it and you'll see the splash screen, as shown below.
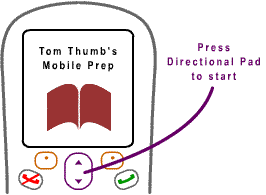
Press the Directional Pad (any direction) to get it started and begin turning downtime into productive time!
2. Features - Key Terms; Test Key Terms; Progress
Key Terms is the main feature of Mobile Prep. It allows you to use a virtual deck of flash cards on your mobile phone. Mobile Prep shows you the front (words or combination of words referred to as Key Term) before revealing the back (definition or associated information) from a shuffled deck. The deck is re-shuffled at the end of each round. You can remove cards that you feel confident in at any time so they won't re-appear in subsequent rounds.
Test Key Terms allows you to test your knowledge of the Key Terms. Instead of showing you the Key Terms, you are shown the definitions and given a choice of five Key Terms from which to choose the correct Key Term. While the Key Terms flash card mode previously described is ideal for exam preparation, the Test Key Terms mode is ideal for the real world: sometimes we know what we want to express but we just "can't seem to find the right words."
Progress indicators show you what you've done so far and how you're doing.
3. Using Mobile Prep - The Main Menu; Prep!; Reviewing Key Terms; Key Terms Status; Removing Key Terms; Resetting Key Terms; Test Key Terms; Test Status; Resetting Test; Progress
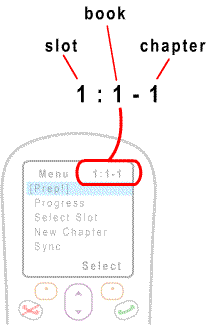
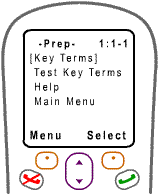
The Main Menu is shown after you leave the splash screen of Mobile Prep. You'll notice a "1:1-1" in the upper right corner. This is the Slot Indicator and it tells you that you are using slot number 1, which holds book 1 and you are on chapter 1. You'll learn about slots, books and chapters later - for the moment, let's move on to the flash cards.
Prep! is the default action when you first see the Main Menu. Press Select Button [Select] to get to the Prep Menu, where you can choose to review the Key Terms or quiz yourself with Test Key Terms (as well as read the help screen or return back to the Main Menu).
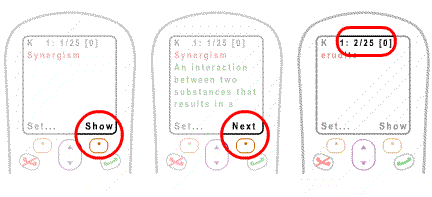
Reviewing Key Terms is simple. PressSelect Button [Select] from the Prep Menu when Key Terms is selected and you'll be shown the front of a flash card, which will have a word or collection of words. Press the Select Button [Show] to see the back of the flash card, which will have the associated definition or information. The same button will then change in function to become Select Button [Next] so that pressing it again will bring up the front of the next card. The status line will show how you've moved to the next card. By pressing the same soft button repeatedly, you can work your way through the entire deck of flash cards. This is shown below.
The Key Terms Status Line is shown at the top of the Screen:
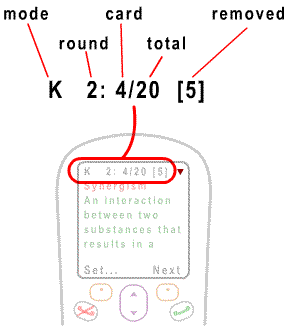
Here's what everything means:
In the above example, you've gone through the deck once already and you are in the second round (round 2). You're looking at the fourth card (card 4) in this round and there are twenty cards (total 20) in the active deck. You removed five cards (removed 5) you're confident in and so do not want to see again in subsequent rounds. (Adding the total number of cards in the deck and the number of cards removed gives you the number of different flash cards you have altogether, which in this case is 25.)
Removing Key Terms from the deck will allow you to focus reviewing only the flash cards you need to spend more time committing to memory. To remove a flash card, press the Set Button [Set...] which will take you into the Options Menu. The default action here is I know this one so pressing the Select Button [Select] immediately after getting to this menu will remove the current card from the deck. The default action then changes to returning to the Key Terms review session, Return to review, so pressing the Select Button [Select] again will bring you back to the review with the next card in the deck. You will notice that the card number has not increased (since the last card was removed, you've moved back by one to offset the card number count). The total cards field, however, has decremented by one while the removed cards field was incremented by one. When you have 0 total cards remaining (and therefore, all the cards in the removed pile) you are done with the deck because you are confident in all the cards!
If you know a card well enough and don't need to review it, remove it from the
deck. Note how the status line changes.
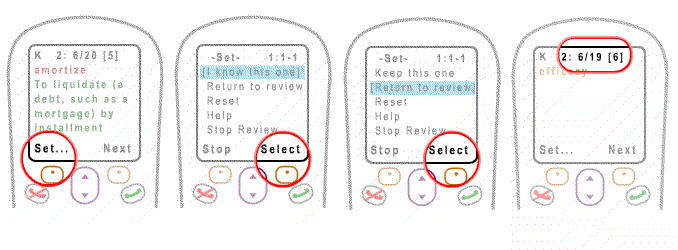
Resetting the Key Terms deck will allow you to take all the cards from the removed pile and put them back into the deck, to be reshuffled and presented again. You can reset the deck by pressing the Set Button [Set...] and then choosing the Reset entry. Resetting at any point will increment the round counter.
Test Key Terms is a great way to see if you really know your Key Terms. The test reverses the flash card relationship: rather than recalling the definition (back of the card) after being shown the Key Term (front), you have to recall the Key Term after being shown the definition by choosing the right correct Key Term from a list of five possible choices.
To use Test Key Terms,
press Select Button [Select] from
the Prep Menu when Test Key Terms is selected. You will be given a multiple
choice question with the definition and five possible choices. Use the Numeric
Keypad to select your choice. You will be shown immediately
whether you are correct or not: the status bar at the top will show a ![]() for correct choices and a
for correct choices and a ![]() for incorrect choices. If you chose incorrectly, you will be shown the correct
choice, highlighted in green.
for incorrect choices. If you chose incorrectly, you will be shown the correct
choice, highlighted in green.
The test can go on forever: new questions are generated on the fly. However, for your convenience they are grouped in a way to guarantee that you will visit every flash card in the deck without having to go beyond the number of cards in the deck. For example, if you have 25 flash cards, then going through the first 25 quiz questions will ensure you've visited each one of the flash cards exactly once. You can continue on after going a deck's worth of questions. The status will show you how many questions you've tried over and beyond the total number of flash cards to get an idea of how proficient you are. You'll see the same definitions again, of course, but the choices may be changed so the question is different.
The Test Status is shown at the top of the Screen:
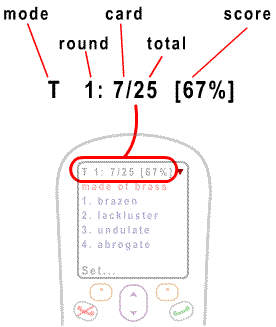
Here's what everything means:
In the above example, you're on your first run through the questions (round 1). You've answered six questions so far and are looking at the seventh question (card 7) in this round. There are twenty five different flash cards in the question pool (total 25). Your got 4 out of 6 right so your current score is 67% correctly answered (score 67%).
Resetting Test Key Terms will reset your score so that you can start over and see how your score is on a fresh session. A new set of questions will be created, shuffled and presented. You can reset the quiz by pressing the Set Button [Set...] and then choosing the Reset entry. Resetting at any point will increment the round counter.
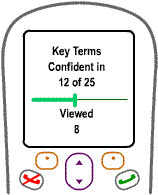
Progress for both the Key Terms review and the Test Key Terms can be accessed directly from the Main Menu at any time by selecting Progress. For Key Terms, you are shown the number of terms you have expressed confidence in by removing them from the deck. A graphical meter shows you the relative amount of words you have confidence in compared to the total number of flash cards in the deck.
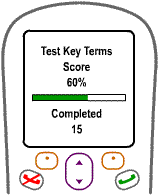
For the Test Key Terms, you are shown your current score and how many rounds you've completed.
4. Useful Tricks - Quick and easy; Know your stuff; Studying on moving trains in dark tunnels
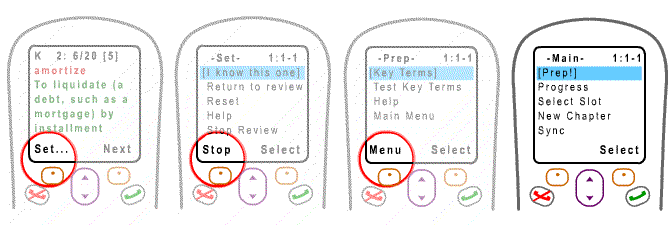
Quick and easy, that's the best way to work through a process that can at times be, well, slow and tedious. Though you don't have the messiness of physical flashcards, the limitations of a small set of buttons on a handset with limited room to indicate what they do could make navigation through a system seemingly overly involved, like this sentence. Luckily, Mobile Prep is designed to give you a smooth simple and experience. But you need to know the tricks. Here's one. Say, you're in the middle of looking at the Key Terms flash cards and you want to return to the Main Menu (to get another chapter, say). If you are new to the system, you'd look carefully at what functions are available to you and you'll probably follow these steps:
Whew! Quite a process. But You'll notice that the Set Button [Set...] changes its label on the Screen to Stop in the Set... Menu so you can bypass finding the Stop Review entry and just press the Set Button [Stop] to stop the review and return to the Prep Menu. Notice that here, the label is changed to "Main" so, pressing the same Set Button [Main] once again, you'll return to the Main Menu. In short, to return to the Main Menu from the middle of reviewing Key Terms or Test Key Terms, simply press the Set Button three times in succession. Simple.
And you've already seen that going through the Key Terms flash cards is simply a matter of pressing the Select Button [Show], which is also the Select Button [Next], over and over again. So using Mobile Prep for its most central features is straightforward, quick and easy!
Know your stuff for sure by testing yourself in two separate sessions: a long one to stabilize your score and a short one to see how you're really doing. This is a good approach because when you first begin the Test Key Terms mode you may still be familiarizing yourself with the terms and so your earlier performance may weigh down your score.
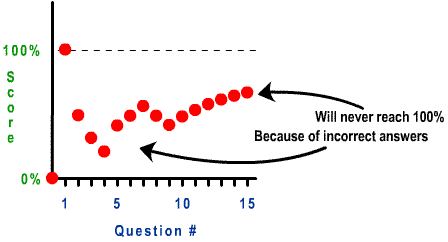
When you start really knowing the terms, your score will improve but it will never reach 100% if you had answered even one question incorrectly. When you feel confident and you notice you are on a roll of correct answers, your score climbing steadily, if slow, you can reset the Test Key Terms and answer exactly the number of questions as there are flash cards. This would give you a good indication of your proficiency.
Studying on moving trains in dark tunnels would not be possible if you needed to have reception for your phone and so services that required you to get text messages or be on-line would not work. With Mobile Prep, you can do all your studying off-line, which means it could be done anywhere - on a train going through a tunnel, at the top of a remote mountain, in a basement lab...basically, anytime, anywhere! No airtime is incurred so you can go through you words over and over again without worrying about finding unexpected charges on your bill.
If you anticipate a situation where you may not get reception for a period of time and your phone allows multiple slots, you may want to get some chapters before that period of time hits so that, when it does, Mobile Prep will have a large library of content you can access.
Mobile Prep comes with one deck of flash cards pre-loaded. Some phones have enough memory to store more than one deck of flash cards at a time. Mobile Prep will detect this to give you up to multiple slots so you can download multiple decks (see New Chapters). If you are given, say, three slots, you can have the first and second for two different decks of GRE words while the third slot holds some drink recipes. Selecting Select Slot from the Main Menu will show you what you currently have in the slots that you can select to be the currently active content to review:
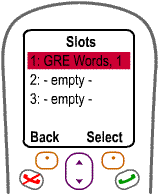
Mobile Prep will always begin with the first slot filled and the rest - if any - empty. If you do not see the Select Slot entry in the Main Menu, it means you phone does not have enough memory to support multiple slots. As for the empty slots, you can load then up with content, as described in the next section.
6. New Chapters: Getting More Content
Because Mobile Prep delivers content from both books and flash cards, to avoid having too many monikers, it refers to a single deck of flash cards as a chapter and a collection of flash card decks that are grouped together as a book. To get more flash cards simply get another chapter by selecting New Chapter from the Main Menu. If you have more than one book (see next section), you'll first be shown a listing of books to choose from. Otherwise - or after that - you'll be shown a listing of chapters corresponding to the number of chapters the book has. After selecting the one you want, if your phone has enough memory, you'll be asked which slot you'd like to put the chapter in - otherwise the current chapter will just be overwritten. A message will indicate that the chapter requested is being downloaded. When it is done, you'll be notified of the fact and when you return to the Main Menu, you'll notice that the Slot Indicator (the numbers in the upper right hand corner showing you the slot:book-chapter you're on) will show the new chapter, which will be the active one by default.
You may be asked, when you make the request, if you will "allow internet access". Answer "Yes" so that Mobile Prep can contact the servers for the information it needs. Please note you will need to have a signal on your phone in order to get new chapters since it will be going over the airwaves to retrieve the material. This can take anywhere from a few seconds to a couple of minutes depending on the size of the chapter, the strength of the signal to your phone and the busyness of the servers (your carrier's and Mobile Prep's). If it appears to be taking too long, you may want to try again - often moving to different location can improve signal strength and waiting a bit might result in less busy servers.
7. Sync: Visiting the Web Bookstore
When Mobile Prep is first delivered to your phone, it came with one book (GRE Words, for example) and one chapter pre-loaded (the first deck of 25 words). The Mobile Prep web site has a number of other books you can get and you can request them by logging in to your account. After choosing one or more books from the web site, you'll need to make sure that the Mobile Prep on your phone is aware of your new books.
To do this, select Sync from the Main Menu. Mobile Prep will contact your account on the server and download the information about your new books. When the upgrade is successfully made, you will be returned to the Main Menu. To check that the operation was successful, go to New Chapter - your new book(s) should be listed.
As with getting new chapters, you may be asked, when you make the request, if you will "allow internet access". Answer "Yes" so that Mobile Prep can contact the servers for the information it needs. Please note you will need to have a signal on your phone in order to get new chapters since it will be going over the airwaves to retrieve the material. This can take anywhere from a few seconds to a couple of minutes depending on the number of books, the strength of the signal to your phone and the busyness of the servers (your carrier's and Mobile Prep's). If it appears to be taking too long, you may want to try again - often moving to different location can improve signal strength and waiting a bit might result in less busy servers.
© 2005 Positive Motion, Inc. All Rights Reserved.